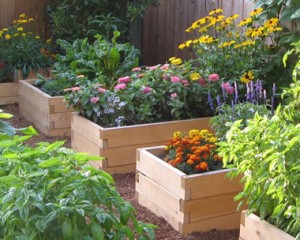
Compliment Your Custom Redwood Fence with a Redwood Raised Garden Bed

We at A&J Fencing are always on the lookout for creative ways to improve your backyard living space. Whether you already have one of our custom redwood fences or patios or not, a raised garden bed makes a great complimenting addition.
In this blog post we’ll show you an easy, do-it-yourself garden bed. Check out more photos and styles on our DIY Pinterest board.
Raised beds help with a list of gardening pitfalls:
- They are filled with soil and compost customized for gardening
- Drainage is built into the bed walls
- Greater exposure to the sun warms the bed which extends the growing season and allows for more plant diversity
- Plants can be spaced closely together maximizing water-use and plant yields
- Raised beds are easy on your back
There are a few things to be aware of before you start building your beds. The most common material to use is wood, and we at A&J prefer redwood for our custom fencing and decking. Not only is it naturally rot resistant, but a raised bed made of redwood would compliment your redwood fence nicely. But whatever wood you choose, it’s important to never use treated or preserved wood. Treated wood can release toxins into your soil and edibles. Make sure to use galvanized or stainless screws or bolts to secure the bed.
Tips on Building a Raised Bed
Location – Look for a nice sunny spot and orient your bed north-south if possible. This takes advantage of available light. To prepare the site get rid of turf and weeds and outline the bed dimensions on the ground. Dig out the outline of your bed a few inches deep. Put down a layer of gravel to improve drainage if need be. Then, to help combat pests like voles and moles, put down a layer of hardware cloth that extends to the outer edge of the wooden frame.
Build your Bed Frame – Sunset magazine has a great article here that gives the exact materials and dimensions for an 8 ft x 4 ft long bed, all materials costing about $172. But you can build your bed or beds any size or dimension that works for your garden. Be sure to leave at least 18 inches between beds for easy maneuverability when gardening. Assemble each wall of your wood frame separately then fasten walls together and put the bed into your dug out position. It’s best to sink corner posts into the ground for stability and this can also reduce outward pressure of a bed full of soil.
Install Bird Netting – To accommodate bird netting attach 1-inch PVC pipe inside the bed. In these holders you can then bend longer pieces of 1/2 inch PVC pipe to form semi circles then drape bird netting or row covers over them. This simple framework can also be used for a greenhouse effect by covering the hoops in clear polyethylene film to raise soil and air temperatures in your beds and extend your growing season.
Start planting – Fill the bed with a planting mix of topsoil, compost and potting soil – moisten it with a spray from your garden hose and begin your planting! Here are a list of cool weather crops great for planting in the fall and visit our Cool Weather Veggie Recipe Pinterest board for delicious veggie cooking ideas.
- Arugula (rocket)
- Beets
- Broccoli
- Brussels sprouts
- Cabbage
- Collards
- Carrots
- Cauliflower
- Celery (mild winter climates)
- Chard
- Fennel
- Kale
- Kohlrabi
- Lettuce
- Mizuna
- Mustard greens
- Onions (bulbing)
- Onions (bunching–standard onions harvested before they form bulbs).
- Pak choi (Bok choy)
- Peas
- Potatoes
- Radishes
- Spinach
- Coriander (cilantro)
Share via social media


