DIY Decorating for your Fence or Deck with Evergreens and Lights
Pick beautiful live evergreen boughs or trees for these DIY crafts pulled from some of our favorite blogs to help you decorate your A&J fence or deck. You can also use artificial garlands to create your own decorations like in this creative tomato cage Christmas tree, perfect to brighten up a corner of your deck.
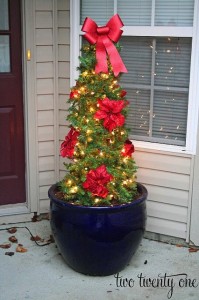 Tomato Cage Christmas Tree – Upend one of your unused tomato cages into a planter and cover it in evergreen garland, Christmas lights and ornaments for a charming corner piece on your deck or patio. Simply wrap the garland around the wire cage attaching with plastic zip ties until the entire cage is covered. Repeat with lights and ornaments. See the step-by-step tutorial here at twotwenty-one.com.
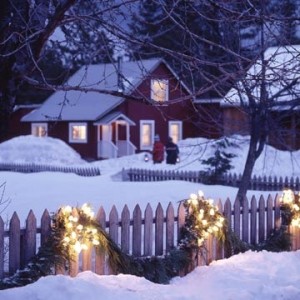
Evergreen Garland with Light Coils – This frosty light and evergreen fence decoration is elegant and incredibly easy. You can find real evergreen garlands at many Christmas tree lots. Drape the fence with the garland then use single short strands of large white frosted lights to form into coils. Simply loop the coils of white lights over the rails of your garland draped fence. Loop the coils so the lights are arranged facing outward and secure them to the fence and garland with plastic cable ties for a beautiful nostalgic winter holiday feel. Bhg.com
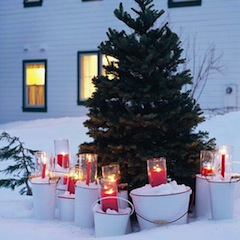 Evergreen Tree Ringed with Candle Buckets – For another spectacular focal point for your deck or patio this simple design is reminiscent of a circle of carolers. A simple small evergreen tree is ringed by candle-filled buckets. Buy tin buckets of various sizes and spray paint them white if you can’t find them in white. Fill them with sand or pebbles and insert cylinder-shaped glass globes to protect the candles from the elements. Use a variety of sizes of globes, buckets and candles to give the grouping a natural quality. Bhg.com
DIY Holiday Lanterns to Brighten Your Deck, Fence or Patio Cover
Tis the season to deck the halls, or light the deck, as we like to say. This is a fun time of year to get creative with decorative holiday lights around your deck, fence or patio cover. Here are some unique DIY lighting ideas from our favorite design blogs that will be sure to brighten up your fence or patio cover.
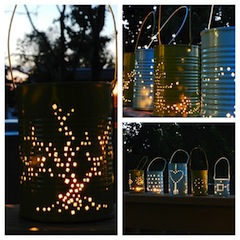 Tin Can Lanterns – With just a touch of kitsch, these do-it-yourself lanterns are affordable, easy to make and look great lining a patio, or hanging from a patio cover or fence. You’ll need cans, a hammer, a nail and bailing wire. First gather some empty cans and peel the labels from them. The trick to punching nice clean holes in the cans is to first fill the cans with water then freeze them so they hold their shape. Use a nail and hammer to create any pattern you like. Punch one hole on either side of the top of the can to hold the wire for hanging the lantern. When you’re done with your pattern let the water melt out of the can and dry the can completely. Cut a 12-inch piece of bailing wire and twist the ends through the holes at the top of the can. Then use an indoor/outdoor spray paint of your choice to paint the can. Give it several coats. Fill with candles and voila – tin can lanterns! http://growcreative.blogspot.com
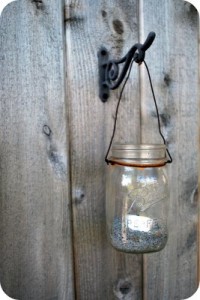 Mason Jar Lanterns – Mason jars make beautiful candle holders and give a nostalgic old-timey feel. Mason jar lanterns are easy to make and look lovely hanging from a patio cover, fence or lining a deck. Simply wind bailing wire around Mason jars, fill with sand, drop in a candle and you’re done. For a holiday twist, attach a ribbon or a sprig of holly or mistletoe to the wire. http://chezbeeperbebe.blogspot.com

Paper Lantern String Lights – Christmas lights are usually the most common way to brighten up your back yard this time of year. String them through your patio cover and wind them around your support beams or along your fence. Perfect for holiday brightening or for a party. In this DIY post, give your Christmas lights a buoyant paper lantern feel by attaching these easy origami paper cubes to your string lights. Here’s how to fold the cubes. Simply fit them around the lights when you’re done folding. Use LED lights if you’re concerned about fire-hazard. Use classic white or get multi-colored paper for holiday colored lanterns. http://witandwhistle.com/blog/
Check out our DIY Pinterest Board for more great holiday decorating ideas for your A&J fence, deck or patio cover.
Natural DIY Fall Decorations for Your A&J Fencing Deck or Patio
Fall is such a wonderful time of year to decorate your deck or outdoor patio. There are many harvest-inspired colors and natural materials available this time of year to play with. Here are a few easy decorations to brighten up your back yard area.
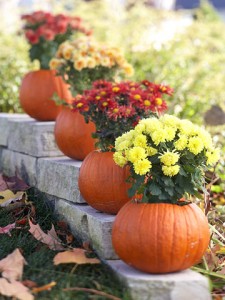 Fall Pumpkin Planters – Hollow out your leftover Halloween pumpkins and fill them with fall flowers or colorful fall tree branches. These bright natural planters look nice lining a patio or along the edge of your deck or retaining wall. The brilliant oranges, reds and yellows draw the eye and are an easy and affordable decoration. Use a glass vase or jar on the inside of the pumpkin to hold the water and allow your pumpkins to last longer. bhg.com
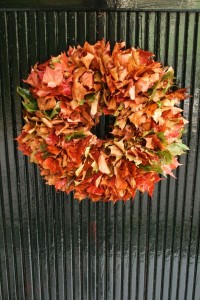 DIY Wreath with Fall Leaves – Do you have lots of colorful fall leaves littering your back yard? Don’t throw them away. Gather them up and make bright seasonal wreaths. All you need are leaves, a Styrofoam wreath ring (you can find this at any craft store) and a hot glue gun. First collect lots and lots of leaves. TIP: to preserve the bright fall colors soak stems in a solution of 1/3 glycerol and 2/3 water for a day or two. Spread leaves out to dry until thoroughly dried. Glue leaves onto the wreath ring one by one so they are tightly bunched. Hang along your fence or door for beautiful natural fall colors. chezlarson.com
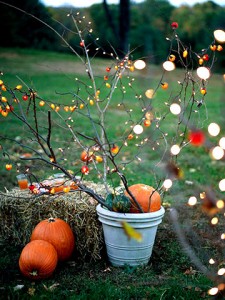 Fall Festive Lights – Create an arrangement of fall branches, gourds and pumpkins, place them in an empty planter or wheelbarrow and drape them with holiday lights. Use white lights or orange hued lights. Position bare branches with rocks or potting soil to hold them upright then place small pumpkins and gourds in the top of the planter. Drape the lights over the branches and pumpkins. You can position this arrangement in the corner of your deck or patio and string holiday lights around the rest of the patio or create several arrangements as focal points. bhg.com
Check out our DIY pinterest board for more fun fall decorating ideas.
*Fall decorating ideas adapted from bhg.com and chezlarson.com.
Compliment Your Custom Redwood Fence with a Redwood Raised Garden Bed
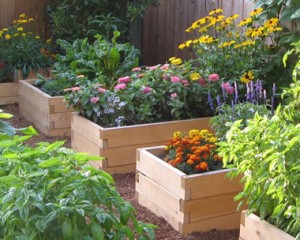
We at A&J Fencing are always on the lookout for creative ways to improve your backyard living space. Whether you already have one of our custom redwood fences or patios or not, a raised garden bed makes a great complimenting addition.
In this blog post we’ll show you an easy, do-it-yourself garden bed. Check out more photos and styles on our DIY Pinterest board.
Raised beds help with a list of gardening pitfalls:
- They are filled with soil and compost customized for gardening
- Drainage is built into the bed walls
- Greater exposure to the sun warms the bed which extends the growing season and allows for more plant diversity
- Plants can be spaced closely together maximizing water-use and plant yields
- Raised beds are easy on your back
There are a few things to be aware of before you start building your beds. The most common material to use is wood, and we at A&J prefer redwood for our custom fencing and decking. Not only is it naturally rot resistant, but a raised bed made of redwood would compliment your redwood fence nicely. But whatever wood you choose, it’s important to never use treated or preserved wood. Treated wood can release toxins into your soil and edibles. Make sure to use galvanized or stainless screws or bolts to secure the bed.
Tips on Building a Raised Bed
Location – Look for a nice sunny spot and orient your bed north-south if possible. This takes advantage of available light. To prepare the site get rid of turf and weeds and outline the bed dimensions on the ground. Dig out the outline of your bed a few inches deep. Put down a layer of gravel to improve drainage if need be. Then, to help combat pests like voles and moles, put down a layer of hardware cloth that extends to the outer edge of the wooden frame.
Build your Bed Frame – Sunset magazine has a great article here that gives the exact materials and dimensions for an 8 ft x 4 ft long bed, all materials costing about $172. But you can build your bed or beds any size or dimension that works for your garden. Be sure to leave at least 18 inches between beds for easy maneuverability when gardening. Assemble each wall of your wood frame separately then fasten walls together and put the bed into your dug out position. It’s best to sink corner posts into the ground for stability and this can also reduce outward pressure of a bed full of soil.
Install Bird Netting – To accommodate bird netting attach 1-inch PVC pipe inside the bed. In these holders you can then bend longer pieces of 1/2 inch PVC pipe to form semi circles then drape bird netting or row covers over them. This simple framework can also be used for a greenhouse effect by covering the hoops in clear polyethylene film to raise soil and air temperatures in your beds and extend your growing season.
Start planting – Fill the bed with a planting mix of topsoil, compost and potting soil – moisten it with a spray from your garden hose and begin your planting! Here are a list of cool weather crops great for planting in the fall and visit our Cool Weather Veggie Recipe Pinterest board for delicious veggie cooking ideas.
- Arugula (rocket)
- Beets
- Broccoli
- Brussels sprouts
- Cabbage
- Collards
- Carrots
- Cauliflower
- Celery (mild winter climates)
- Chard
- Fennel
- Kale
- Kohlrabi
- Lettuce
- Mizuna
- Mustard greens
- Onions (bulbing)
- Onions (bunching–standard onions harvested before they form bulbs).
- Pak choi (Bok choy)
- Peas
- Potatoes
- Radishes
- Spinach
- Coriander (cilantro)
Helpful Tree Care Tips From the City of Walnut Creek
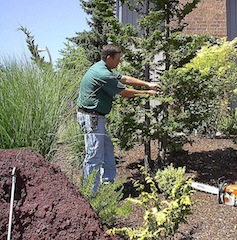 The City of Walnut Creek offers some great tree care resources and tips from their own arborist John Davis.
The main concerns when caring for your trees is to hire the right tree care specialist, make sure that you do not over-thin, and never top your trees as topping is one of the most harmful, yet commonly-used practices in tree care today.
Hire The Right Certified Arborist – If the trees around your home require that you climb a ladder or start a chainsaw in order to remove dead limbs or prune, then it’s probably time to hire some one to help you. When hiring a tree-care professional, it’s important that you hire a Certified Arborist. Certified Arborists are individuals who have achieved a level of knowledge in the art and science of tree care through experience and by passing a comprehensive examination. Certified Arborists not only know what they’re doing and will make the health of your trees a top priority, but they are licensed and carry insurance. It’s important to ask your tree care service for proof of insurance as you will be responsible for any injury or damage that occurs on your property. Also make sure that the tree care service you choose has a valid license certified by the California State Licensing Board. You can verify the legitimacy of the license by calling 1-800-321-CSLB, or use the website www.cslb.ca.gov.
Do Not Over Thin Your Trees – Keep in mind that the most important pruning in the life of a tree is done when the tree is young, this shapes the initial structure and strength of a tree. In mature trees, pruning should be limited to “crown-cleaning” which is the selective removal of “dead, dying, diseased, crowded; weakly attached and low-vigor branches from the crown of the tree.” Thinning should rarely, if ever, be done in mature trees as it can cause some major problems, like:
- Exposure of the bark to the sun resulting in sunscald and cracking of bark
- Rapid increase of growth, which depletes the tree of its natural reserves (food) and increases the likelihood of disease and pest problems.
- A lack of branch taper, which can lead to branch failure.
- The removal of living tissue decreases photosynthesis, which is a necessary process in the production of food for the tree for new growth and fighting disease and pest problems.
Harmful Tree Topping – Topping is perhaps the most harmful tree pruning practice known, yet it remains a common practice today. Topping stresses trees by removing much of the leaf-bearing crown. Since the leaves create the “food” for a tree, this can temporarily starve a tree and trigger a survival mechanism forcing the tree into “rapid growth” mode which, if the tree does not have enough stored energy reserves, can seriously weaken and kill the tree. A stressed tree is more vulnerable insect and disease infestations and topping also causes decay and can lead to sunburned branches.
Visit the Tree Care Industry Association web site for more helpful tips and information and to find a certified arborist in your area. Visit Walnut Creek’s Tree Care Tips & Regulations page for more information as well as for tree removal permit and application forms.


